Ipinapakita ang mga post na may etiketa na elfph. Ipakita ang lahat ng mga post

Martes, Mayo 19, 2015

Eyebrow Routine using an Eyebrow Cake/ Powder.


Hi everyone! It's been awhile! I finally had the time again to do a blog. (I have all the time in the world now! Ha!) My previous post was about my eyebrow routine using a pencil, now I'll be sharing with you guys how I do my brows using a Powder/Cake.  I have two ways of doing it because it depends if I have the time to perfect them brows and I want them to be precised or I dont have the time and I dont want to put too much effort on it.  It also depends on my mood. ;)


Ill be using my Marionnaud brush, it's dual ended so it's handy! It comes with a brush for the application on the other side, and the other one is a spoolie. Very convenient!


Next, is the star of the show ( I mean, post). It's my Eyebrow Cake from NYX in Taupe.


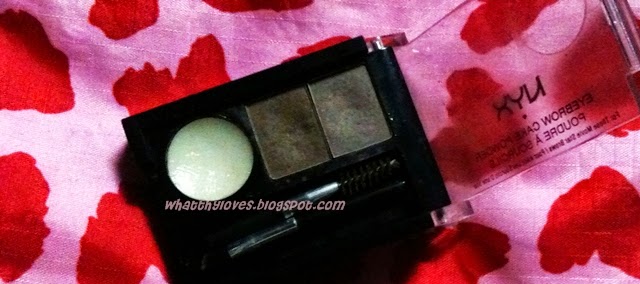
Inside, you can find two mini brushes. One spoolie and the other one is just an ordinary brush.  It also contains a wax, two shades of powders: One light and one dark.

Here's how I use this.


First is of course to brush your brows in place. Then, with that mini brush, I dip it into the wax and apply it to my brow hair just so it would stay in place.


You can use a setting spray or just water.


Sprayed some on the cover.


I find it easier to use and the color shows its true shade when it's use with a damp brush.  Plus, that's why it's called eyebrow cake because it's easier to blend with if it's a little bit damp. ( dont quote me on that though haha. )


I dip my damp brush into the two shades then take off the excess with a clean tissue paper.  I outline my bottom part of my brows.


Then my upper part.  I blend them afterwards and then put some for the sparse parts of my brows and then brush it off using the other end of my eyebrow brush.


If you have put too much and you messed the shape of your brows you can always use your concealer and clean it up, like what I did in my previous post
Here's how they look!


Full make up list:

Fashion 21 Two way cake
Jordana blush
Wet & Wild Just Peachy and mixed with NYX Matte in Angel.
Maybelline's Falsies Mascara
NYX Concealer Jar


'Till next post!

`Thy!


Linggo, Pebrero 23, 2014

Atlast! Avon Color Fold Up Pallette!


Do you ever feel like copying one of those great eye makeup and ended.. so different.  so you just kept going and added up some of your signature look…. and pose? lol.  
image


This look was supposedly a plum and pink not so smokey.. I dont know what happened.  LOL.  Was it too blended? Uhh. Or its the eyeshadows fault?  Thats why im on the search for a good eyeshadow pallette. 

So okay, a little tutorial for you guys plus the products I used. (Images overload right here!)
image
image
image


How I did it.. (no pictures/videos though.)

1. Primed my face with Maybelline Pore Eraser.
2.  Applied Ever Bilena’s Advance Shine Free Liquid Foundation. (Not really a Shine Free Liquid Foundation though, My Aunt just gave it to me to try out.)
3.  So since, the liquid foundation is a No No.  I set it with Fashion 21 Two way cake with tea tree oil in the shade of Natural with Elf’s Studio Flat Top Brush from the primp pad! :D
4.  I did my eyes first since I know that the pallettes are very shimmery, it will fall out all over my face. 
  • Pat on some elf eyelid primer. Blend it.
  • Put that shimmery pink all ove the lid. (Nichido flat eyeshadow brush)
  • That light brown shimmery eyeshadow for the crease just to define it. (Elf’s Eye precision brush)
  • Then that plum/dark violet on the outer V of your eyes. (Marionnaud Flat angled Brush)
  • Then, blend to soften the edges. (Elf’s Blending Brush)
  • Put on some of the pink in the middle of the lid to have that transition. Then blend it again with plum.
  • line your eyes (Elf’s Cream Eyeliner)
  • Put some mascara (Elf)
5.  Do your brows. (Follow where your brows are. ;) ) Put some concealer below your brows to highlight your browbone. (Nyx Eyebrow Cake in Taupe,  Avon’s angled brow brush)
6.  Contour your face. Yes, do the fishy face! I dont know if the Nyx Blush in Taupe worked on my face. lolol. (Avon’s Powder/Blush Brush)
7. Blush!
8. Powdered my face with my f21 two way cake just to cover those imperfections. HIHI. 
9.  Oh I used the lipglosses in the pallette, but I think, Its not that pigmented.  I used the peach one right there and the dark brown to line my lips.  And i dont have that nude lippies yet,  So I used my Sophie’s Mango Peach lippy?

So there you go! :D

Inarte mode on! :D
image

image
image
Till Next post! 

Have a Merry Christmas and a Happy New Year! <3


`iThy!

Get Ready with me! (School/ Natural/No makeup, Make-up look, Routine!)


image
Hey y’all! I tried to film a tutorial using my phone for a make-up tutorial.  I didnt like how it went and I think I am not ready for make up tutorials videos so, i just took screenshots from it. Hahaha! :p
Ever since I broke out from all the facial creams and maybe, heavy makeups.  I tried to minimize the number of cosmetics I use for everyday or school.  So, this look is just to freshen up and not to look so pale while doing what I love, obviously that is putting some make ups. LOL. 
Bare face! Boo!!!
image
I already moisturized and primed my face with iWhite Aqua Moisturizer something then Maybelline’s Baby Skin Pore Eraser.
Next is to conceal my imperfections. :( Wuhuhu. Zits just healed and left me with scars. I used Nyx’s Jar Concealer, I bought from digitaltraincase.com with Avon’s concealer brush then blended it using my ring finger.
image
(LOL.)
image
image
Set the concealer with a powder foundation.  Here, I used my Fashion 21 Two Way cake with Tea Tree Oil using my Elf’s Studio Powder Brush.
image
For the Brows, I used my NYX’s eyebrow cake in Taupe.  I used the dark shade since I’m going for a natural look.  I sprayed a little bit of water on the brush.  I first outlined my brows then used the spoolie that came with the eyebrow cake. 
image
image
image
image
Eyelash!  Curled my eyelashes then I coated it with my Maybelline Falsies Mascara. It brightens the eyes, for sure. :D  
image
image
Blush!  I used Ever Bilena’s Blush in Raisin. I dont know how to explain this shade it’s a reddish orangey blush. Perfect for the natural look!  Applied not a lot of it, I like my blushes to look like my cheeks were just pinched. :p
Blurred my face. HAHAHHA.
image
image


Then for the lips, I primed my lips with a petroleum jelly and sometimes, I use my Maybelline Lip Balm. Then, applied Sophie’s Lipstick in Mango Peach.
image
Tuhdah! :))))))
image


No make up, make-up look for School, well for me. =))
`Thy!